VFP8/VB.NET Web Services Sample
Introduction
Setting Up the Samples
Prerequisites
Installing the Samples
Verifying
Database connection strings
Configuring the VFP web service to use local data
Specifying a different Virtual Directory
Testing the Samples
Running the Client Form
Updating Data
Inserting Data
Deleting Data
Middle-tier
Validation Messages
Database Error Messages
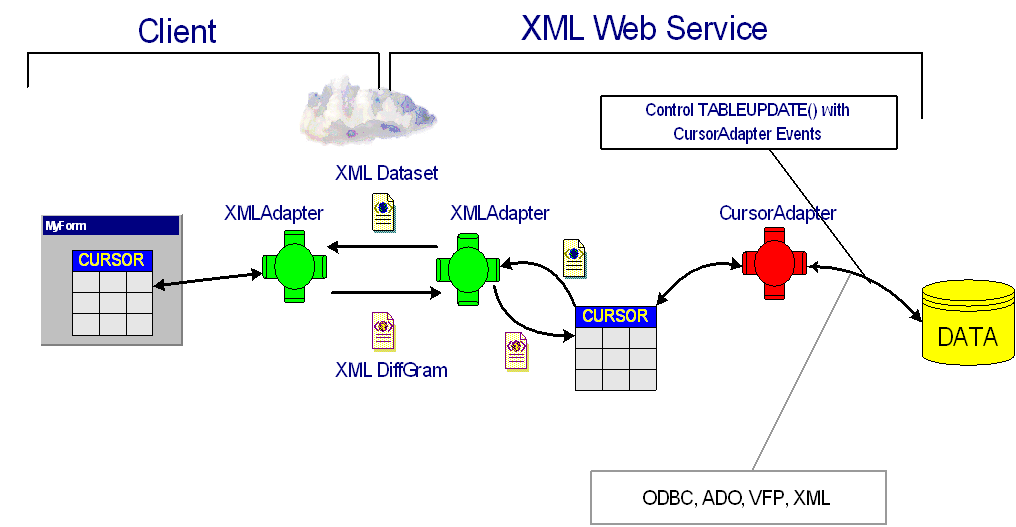
CursorAdapter with
XMLAdapter on the Client
VFP Client and VFP XML Web Service
Diagram
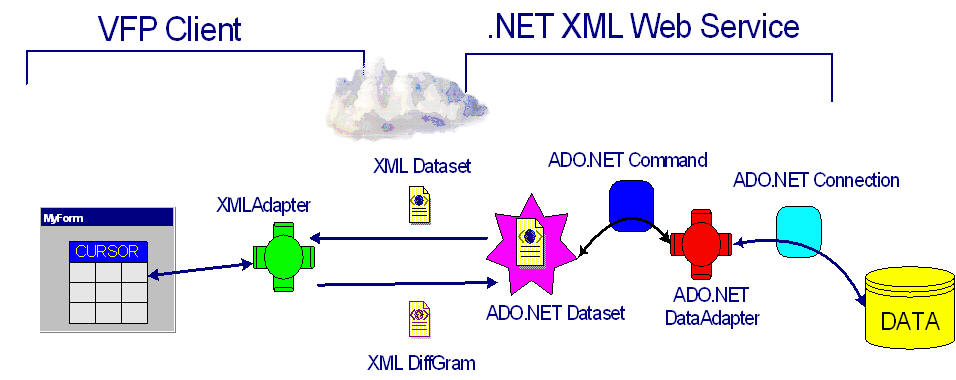
VFP Client and VB.NET XML Web
Service Diagram
This sample shows different architectures for exchanging data between a VFP
client and a middle tier written in VFP and VB.NET using XML Web Services. This
sample uses two new classes of VFP8; the XMLAdapter and the CursorAdapter. The XMLAdapter class has the ability to create cursors from hierarchical
datasets generated from other VFP8 XMLAdapters or from ADO.NET. The
CursorAdapter can be used on the client to bind to cursors created from XML datasets or on the middle
tier to fine tune updates to many data sources. This example also uses the
SQL-Server/MSDE Northwind database as its data store.
- Windows2000 SP2 or higher (XP Recommended) with Internet
Information Services 5.0 or higher installed.
- SQL-Server or MSDE with Northwind database installed. (If you do not have
the Northwind SQL-Server/MSDE database you can still run the VFP web service
described in the "Configuring the VFP web service to use local data" section
below.)
- Visual FoxPro 8 with SOAP 3.0
(installed by default with VFP8)
- To build and run the VB.NET web service piece, you will need version 1.0
or higher of Visual Studio.NET. (If you do not have this installed, you can
still run the VFP Web Service piece.)
- From the Samples\WebServices\Northwind click on the NorthwindWebservice_Setup.msi to install
the source code, components and IIS Virtual Directory.
- It is recommended that you leave the default name for the Virtual
Directory (NorthwindWebService) otherwise you will need to update the wsdl,
client form and project files (see below for details on which files you will
need to update.)
- After the installation completes, you will need to configure SOAP 3.0 on
this virtual directory. To do this, run a batch file located
in your Program Files\MSSOAP\Binaries\ folder. From a command prompt:
C:\Program Files\MSSOAP\Binaries> SOAPVDIR UPDATE NorthwindWebService
This sets up the virtual directory's Application Mappings. To verify this,
you can open Internet Information Services and right click on the
NorthwindWebService virtual directory and select Properties. Click on the
configuration button which will open the Mappings. Scroll to the bottom and you
will see the .wsdl extension and the executable path will be the path to your
SOAP3.0 Application Extension (C:\Program Files\Common Files\MSSoap\Binaries\SOAPIS30.dll).
- Before running the sample you will need to verify the connection
strings to your SQL-Server. By default the sample uses a username of "sa" and
a blank password. If you do not need to change this you can skip to "Testing
the samples" below. If you do not have SQL_Server/MSDE Northwind database
installed, you can still run the VFP web service with local data. Skip to
"Configuring the VFP web service to use local data" section below.
- To modify the VFP code, open the project
\InetPub\wwwRoot\NorthwindWebService\VFPSource\NorthwindWebService_VFP.PJX. In
the project there is a program called DataAccessLayer.prg. Modify the
connection strings in the class definitions so they are valid. For example,
the SQL-Server access is contained in the connection string of the
SQLNorthwind class:
cConnectionstring = "Driver={SQL Server};Server=localhost;Uid=sa;Pwd=;Database=northwind"
You will need to change the Uid and Pwd values here.
- Recompile the NorthwindWebService_VFP project as a Multi-threaded COM
Server (DLL). (Note: If you accidentally ran the component as a web service
before realizing that the connection string was incorrect, you will need to
shutdown IIS services before recompiling. From a command prompt, type
iisreset.)
- To modify the VB.NET source code, double-click on the VB.NET project
\Inetpub\wwwroot\NorthwindWebService\NorthwindWebService.vbproj. This will
open Visual Studio.NET.
- From the solution explorer expand the VBSource folder and double-click on
the DataAccessLayer.vb file. This will open the code in the editor window.
- Modify the connection strings at the top of this class as appropriate. If
you use Integrated Security, you can enter a valid username and password in
the impersonation section of the web.config file. So instead of the web
service running under the local ASPNET account, it will run under the account
you specify. Uncomment the impersonation section in web.config and enter the user name and
password here. I.e.:
<system.web>
<!-- IMPERSONATION
You can set the identity below so that this web service will run as a domain or
local user account.
-->
<identity impersonate="true"
userName="DOMAIN/myusername"
password="mypassword"/>
- Type Ctrl+F5 to recompile. It will ask you to save the Solution first
and then it will recompile the web service. If it asks you to set an initial
start page before it runs, from the solution explorer right-click on the GetNorthwindData.asmx file and select "Set as Start Page" from the
shortcut menu. You can then test the VB.NET Web
service through the default web page access Visual Studio provides.
Configuring
the VFP web service to use local data
- To modify the VFP code to use local data, open the project \InetPub\wwwRoot\NorthwindWebService\VFPSource\NorthwindWebService_VFP.PJX.
In the project there is a program called DataAccessLayer.prg. Verify the
Datasource property of the VFPNorthwind class is the correct absolute path to
the VFP Northwind.DBC that is installed with VFP8 in the Samples\Northwind
folder. i.e.
DataSource = "C:\PROGRAM FILES\MICROSOFT VISUAL FOXPRO 8\SAMPLES\Northwind\Northwind.dbc"
- In the DataAccessLayer.prg, modify the class definitions of the
datasource classes to inherit from the VFPNorthwind CursorAdapter class. There
are five concrete datasource classes you need to change: CustomerDataSource,
SupplierDataSource, ProductDataSource, OrderDataSource, and
OrderDetailDataSource.
DEFINE CLASS CustomerDataSource as VFPNorthwind
- Recompile the NorthwindWebService_VFP project as a Multi-threaded COM
Server (DLL). (Note: If you accidentally ran the component as a web service, you will need to
shutdown IIS services before recompiling. From a command prompt, type
iisreset.)
If you decided to change the name of the Virtual Directory when running the
Setup for the web services, you will need to update the following files:
With a text editor update the following files to point to the correct virtual
directory:
Intepub\wwwroot\MyVirtualDirectory\Northwind.wsdl
Intepub\wwwroot\MyVirtualDirectory\NorthwindWebService.webinfo
From the VFP Form designer open the following forms:
Samples\WebServices\Northwind\frmcustomersws.scx
Samples\WebServices\Northwind\frmcustomersca.scx
You will need to update the oVFPWS and oVBWS web service objects on the top
left of the form. The property you will need to update is wsdl. Change the wsdl
property from the property sheet to the correct location of the WSDL files. For
example, currently the property value for the oVFPWS object is:
http://localhost/NorthwindWebService/Northwind.wsdl
You should change this to read:
http://localhost/MyVirtualDirectory/Northwind.wsdl
Before running the client application it is a good idea to test to make sure
the web services and components are running properly.
- First test the VB.NET Web Service if you have not done so already. Do this
by opening your browser to
http://localhost/NorthwindWebService/GetNorthwindData.asmx.
- From this page select the GetCustomerByID method.
- Type "ALFKI" for the cID parameter value then click the Invoke button.
- You should see another window open with the contents of the customer
dataset.
- Next we will test the VFP code via COM to make sure it runs fine before we
access it via SOAP. It is always a good idea to test your VFP components via COM
before accessing them via SOAP.
- From the VFP command window (or a prg):
o = Createobject("NorthwindWebService_VFP.Northwind")
? o.GetCustomerByID("ALFKI")
o = null
- You should see the customer XML dataset output on your screen.
- Next, we will test this as a VFP Webservice via SOAP. Open up the Toolbox
from the VFP Tools menu.
- Click on the My XML Web Services category and double-click "Register".
This will open the Web Services Registration wizard.
- Type in the location of the VFP Webservice WSDL file "http://localhost/NorthwindWebService/Northwind.wsdl"
and click Done. This will generate your intellesense scripts. You should also
now see the Northwind web service item in your toolbox.
- Open a new program file.
- Drag the Northwind web service tool from your Toolbox to the editor
window. This will drop the appropriate SOAP client code for calling the
Northwind web service.
- In the TRY block, type in a call to the GetCustomerByID method:
...
TRY
	loWSHandler = NEWOBJECT("WSHandler",IIF(VERSION(2)=0,"",HOME()+"FFC\")+"_ws3client.vcx")
	loNorthwind = loWSHandler.SetupClient("http://localhost/NorthwindWebService/Northwind.wsdl", "Northwind", "NorthwindSoapPort")
	* Type your XML Web service code here:
	* ex: leResult = loNorthwind.somemethod()
	? loNorthwind.GetCustomerByID("ALFKI")

CATCH TO loException
....
- Save and Run the program.
- You should see the customer XML dataset output to the screen.
- If you have problems running the web services, this may indicate that the
components were not installed correctly. Follow the steps for "Verifying
Database connection strings" above which will recompile and reregister the
necessary files. Also make sure you have performed the SOAPVDIR update on the
virtual directory outlined in step 3 of "Installing the Samples".
The client form demonstrates working with multiple disconnected records
returned from the Northwind database via the web services. It also generates XML
diffgrams that are sent into the web services to update, insert and delete
records form the Northwind database. The VFP Webservice uses the XMLAdapter
class to re-construct the changed cursor on the middle-tier and then attaches it
to a CursorAdapter which performs simple data validation via its
BeforeCursorUpdate() event. This fires before the data is actually sent to the database. You
can use CursorAdapter events to fine tune your table updates. You can also use
the CursorAdapter on the client if you want design-time data binding and you
know the schema of your tables.
To run the client form do the following:
- Run the frmCustomersWS form located in your VFP8 directory \Samples\WebServices\Northwind.
(From the command window: DO FORM frmCustomersWS)
- Select the Access method from the dropdown on the upper right of the form.
It defaults to VFP Web Service.
- Click the "Find Customers" button at the top of the form. This will bring
back an XML Dataset which is displayed as a cursor in the grid that will
appear on the form.
- Click the "Show Dataset" button at the bottom of the form to view the
Dataset returned from the web service.
- Make changes on a record and click the Save button.
- Click the "Show DiffGram" button at the bottom of the form to view the
DiffGram sent to the web service.
- Click the "Find Customers" button to re-retrieve the data and verify the
changes were made.
- Scroll to the last record on the grid and press the down arrow on your
keyboard to add a new record.
- Type in an ID and a company name and click Save to insert a record.
- Click the "Show DiffGram" button at the bottom of the form to view the
DiffGram sent to the web service.
- Click the "Find Customers" button to re-retrieve the data and verify the
insert actually happened.
- Delete the record you just added by clicking the delete mark and click
Save to delete the record.
- Click the "Show DiffGram" button at the bottom of the form to view the
DiffGram sent to the web service.
- Click the "Find Customers" button to re-retrieve the data and verify the
record was deleted.
Validation and error messages are sent out to the client via a reference
parameter in the call to the web service's UpdateSingleTable() method. Open up
the form's Save() method to see this. Try this one out by inserting or updating
a record without a Company Name. You will see the validation message in a
message box on your screen.
Database exceptions are also sent out to the client via the same referenced
parameter. Try this one out by inserting or updating a record without a
CustomerID. You can also try deleting a Customer that has Orders or inserting a
duplicate CustomerID. You will see the database message in a message box on your
screen.
There is also a second client form included in this sample that uses a
CursorAdapter class in conjunction with the XMLAdapter class called
frmCustomersCA.scx. This allows us to design forms and use data binding in the
same manner as when working with local tables. Fields from the CursorAdapter can
be drag-dropped onto the form. This will automatically set the ControlSource to
the CursorAdapter field that was dropped.
To run the client form do the following:
- Run the frmCustomersCA form located in your VFP8 directory \Samples\WebServices\Northwind.
(From the command window: DO FORM frmCustomersCA)
- Select the Access method from the dropdown on the upper right of the form.
It defaults to VFP Web Service.
- Click the "Find Customers" button at the top of the form. This will bring
back an XML dataset. This dataset is attached to a CursorAdapter that is in
the form's DataEnvironment and is then bound to the grid and textboxes on the form.
- Click the "Show Dataset" button at the bottom of the form to view the
Dataset returned from the web service.